Note To Self...
NOTE TO SELF...
DIY #2
For this DIY I decided to make something that could be a cute decoration idea, but with a purpose. There are many ways you would be able to do this, but this is how I did mine.
To start the DIY off your going to need a picture frame.
I used a 5X7 because I didn't want anything too big, but the size is totally up to you.
Next, you need your choice of paint color and your choice of paint brush.
I used a matte acrylic paint in lavender sachet. I also used the thinnest brush I had because the design I was going for is very detailed.
Now that you got what you need...
you can PAINT!
You can do whatever you think is nice. The possibilities are endless!
Almost done...
Now that you got the whole frame painted it's time to put together the stand for the frame.
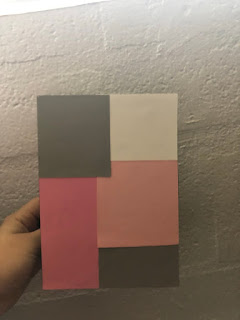
For this your going to need paper. I used card stock paper, but you can totally use construction paper, magazines, an actual photo, or if you want you can just paint it.
You won't be needing the glass for this project so you can put it on the side.
What I decided to do was grab some small pieces and put them together.
I just glued the pieces together to create my background.
While I let that dry you can go and grab yarn string, or thread. You can honestly use whatever you have around the house.
Measure how much you need and cut it off.
Once you think it's done drying you can add stickers or even write something on top. I decided to put smile right on the bottom.
After, I took a piece of yard and wrapped it twice around the stand.
Then I tied the yarn in the back. Make sure to double knot it to be safe.
Now you can put the two together.
ALMOST DONE!
Now your going to need some tiny clips.
These things are so small that it's adorable!
If you don't have any, and don't want to buy any, you could always use paper clips.
Don't have paper clips? The just fold the top of the little paper and hang it.
Once you get the clips on it's time to put stuff on it!
You can put whatever you want on it. I put a little note of stuff I need to get done for the day, and a coupon for a restaurant so I actually can remember to use it. I also just cut out a heart to fill the space of the last clip.
Now that it's done, we have to find a place for it. Not going to lie... my desk is a little to messy for this at the moment so I think I'll put it by my bed, so when I wake up it's one of the first things I see.
This was a fun project to do, and it can totally be done in different ways.
Here are some other options that you can use this DIY for.
Instead of a picture frame you can use a canvas. All I did was paint the canvas to my liking. At the time my blanket was something similar to the paint I chose on the canvas. I also painted "Mistakes are proof that you are trying" because this I knew was going by my desk. It's just some motivational words.
I also had another canvas with a wider frame that I painted, and for this one I just put a picture inside. (That's a picture of my dog on his first night at his new home.)
Making this was relaxing. I was able sit, put some music on and paint my life away. This could also be a cute and inexpensive idea for a gift. To be honest I don't remember how much the frame was because I got it ages ago, but I usually go to Ross to get these frames because I feel like it's always cheaper there. The only thing is, you have to go at the right time to grab it.
Anyways I hope you enjoyed my DIY for the week!


This is amazing! I love that you're showing us such detailed steps!! I will definitely be doing this in the future, thank you.
ReplyDeleteWow, it turned out so nice! I like that you provided pictures to match each step. I have some frames lying around the house, so I should definietly make use of them with this fun DIY. I like the colors that you chose and the clips were a nice touch.
ReplyDelete